Designing a Linear Actuator in Altair SimLab
In this post we look at using Altair SimLab to design a linear actuator. Previous posts include using Altair Flux.
In a previous video (Designing a Linear Actuator in Altair Flux), we walked through the process of using Altair Flux to design and analyze a linear actuator. Today, we will review a similar example, but we will walk through the design process using Altair SimLab. The SimLab environment allows engineers from a wide range of disciplines to design, simulate, and analyze an extensive array of assemblies under a multi-physics lens. Users can set up and run structural, thermal, fluid, and electric analyses all within one interface.
While many users in the low-frequency electromagnetic space may already be familiar with Altair Flux, they may be unaware that Altair has integrated Flux capabilities into SimLab as well. This blog will serve as the first portion of a two-part series covering the process of device design and simulation in SimLab. Specifically, we will walk through the process of using the CAD interface and tools to design the assembly that will act as our linear actuator.
We will begin with the Sketch interface, and we will select a plane on which to begin sketching. For this example, we will choose to sketch on the XY plane, as shown in Figure 1. Users can choose any plane, but it is important to note which one you are using to ensure accurate designs.
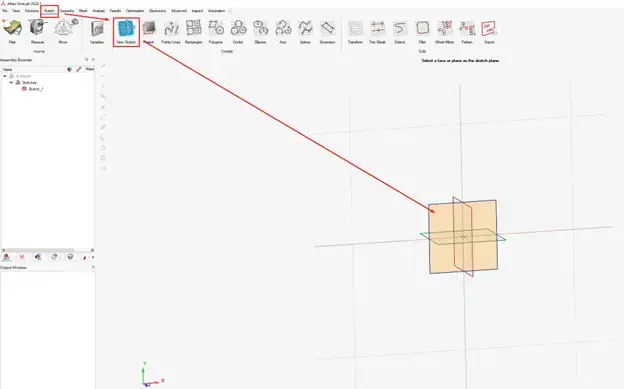
Fig 1. Beginning in “Sketch” interface and selection of work plane.
This will change our view to a “top-down” view of the selected plane, where we can begin drawing our basic shapes. We will use the “Rectangle” tool, and select the option that allows us to define two opposite corners, as shown in Figure 2.
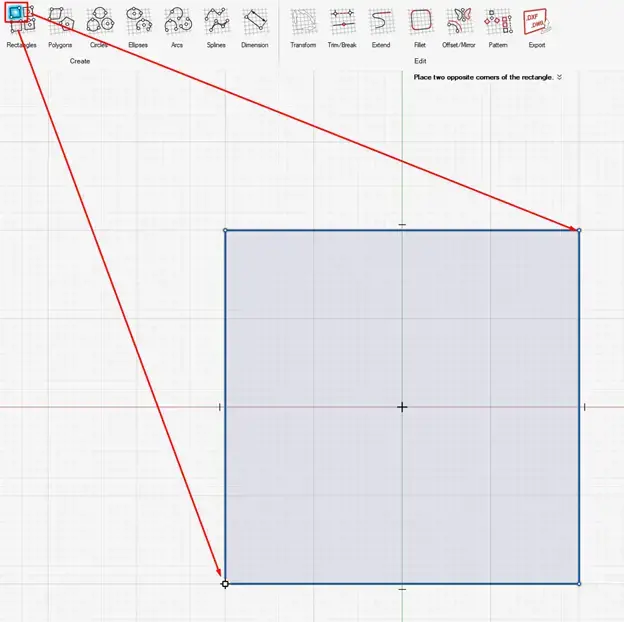
Fig 2. Drawing initial shape in 2D work plane.
From there, we can go ahead and add our second rectangle. Figure 3 below shows that we can also select a specific corner and define exact coordinates. This allows us to verify that our models align exactly with our design specifications.
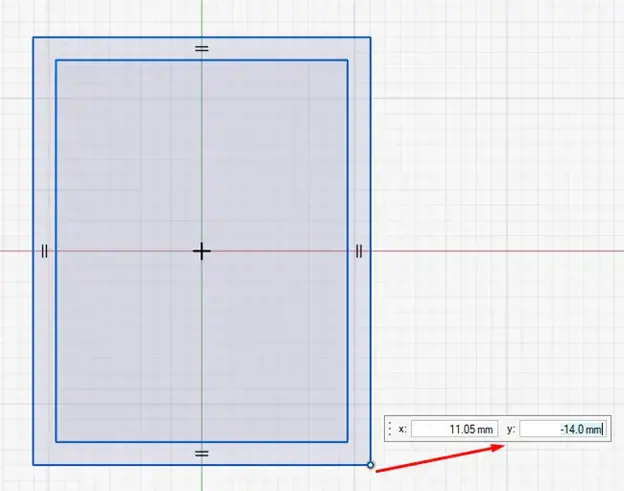
Fig 3. Adding and customizing shapes in 2D work plane.
Now that we have the beginning of some 2D structure, we can apply more customization, such as adding fillets to the corners. Figure 4 below shows the process of using the fillet tool, defining a radius, applying it to all corners of interest, and viewing the updated model.
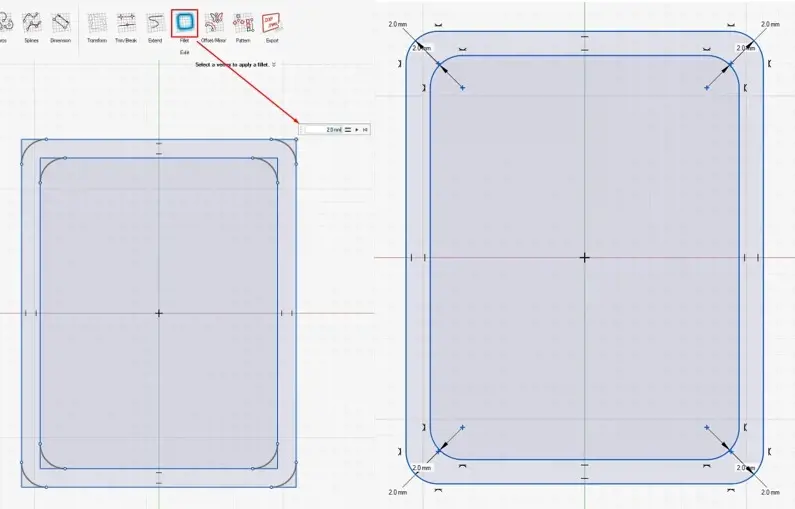
Fig 4. Applying fillets to multiple corners in work plane.
Once we are satisfied with our 2D sketch, we can prepare this portion of the model to be brought to life in 3D. Figure 5 demonstrates the process of realizing each component of the sketch as an individual body in the 3D geometry interface.
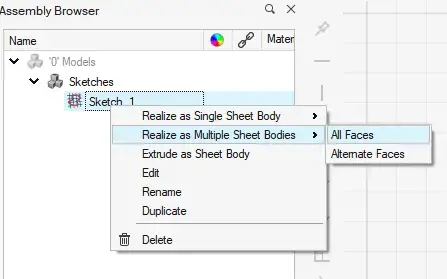
Fig 5. Creating faces from sketches to begin work in 3D.
At this point, we can migrate to the “Geometry” tab of SimLab to begin applying more complex customizations. We will use the Extrude feature to extend the two faces we previously sketched into the third dimension. Figure 6 shows how we can access this tool, select the faces, and define the distance to extrude the sketch.
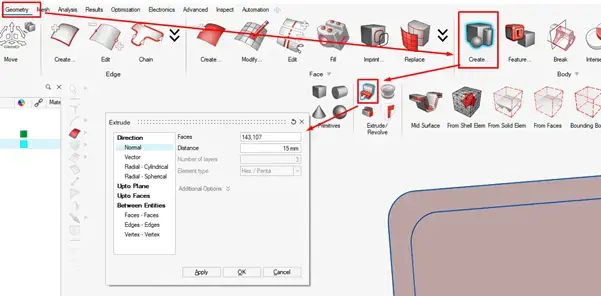
Fig 6. Extrusion of 2D faces into 3D bodies.
We now have a 3D model that represents the beginning of the support for our linear actuator!
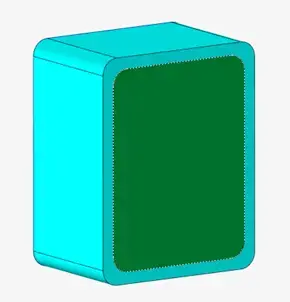
Fig 7. Extruded 3D bodies to design support for linear actuator.
We do not need the green inner portion of this geometry, though, so we can use the Boolean subtract tool to remove the inner geometry from the outer geometry, leaving us with just the external portion of the support, as shown in Figure 8 below.
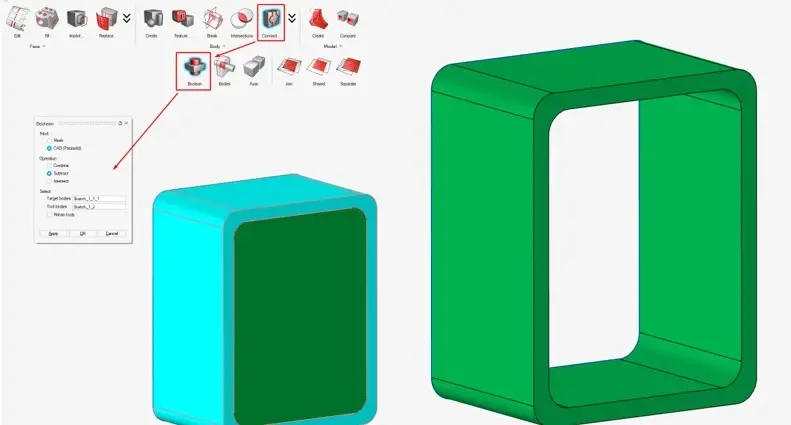
Fig 8. Use of Boolean subtraction to hollow out model.
We can continue to add to our model using the “Sketch” interface. However, we can now choose faces within our 3D environment as the working plane for the sketch. We will further refine the support assembly by selecting one of the larger sides as our new sketch plane, as shown in Figure 9.
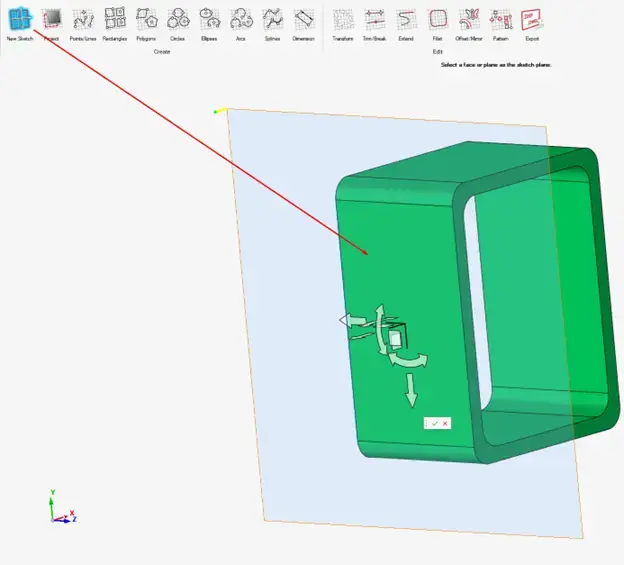
Fig 9. Defining a sketch plane on the 3D model.
Similar to how we defined rectangles earlier, we can define circles in our sketch. We have a few options of how to define the circles, but we will use the center and diameter option. Again, we can draw the initial circles of our sketch, and then select the shapes to customize them to a finer degree, as demonstrated in Figure 10.
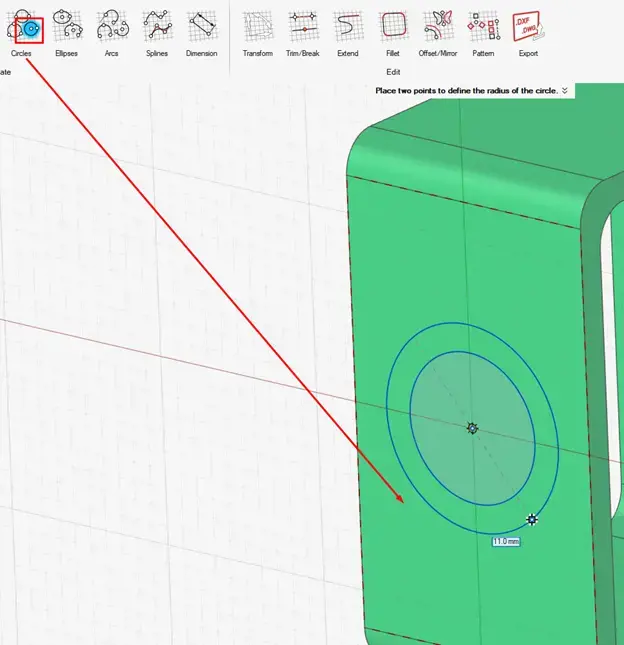
Fig 10. Adding customized circles to new sketch work plane.
We will repeat this process on the mirroring side of the support assembly, creating identical circles on the opposite face. After that, we will run through the same set of steps outlined in Figures 5 & 6 to create faces in the 3D environment and extrude them by a desired length.
After that, we will use the Boolean subtract tool again to hollow out these new circular sections of the model, which can be seen in Figure 11. This will provide us with a slot to insert the arm of the actuator later.
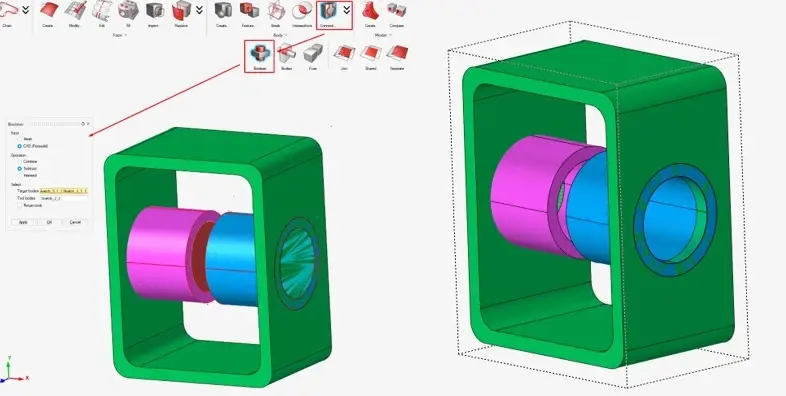
Fig 11. Use of Boolean subtraction to generate circular holes for actuator arm to pass through.
We are now finished with the geometry for the support of the actuator, so we can use the Boolean combination operator to merge all of these into one body, as seen in Figure 12.
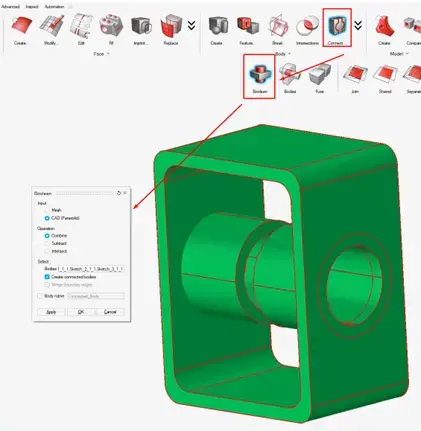
Fig 12. Combination of geometric bodies into one body within the entire assembly.
We are now ready to begin working on the geometry of the arm of the actuator. Previously, we were using the “Sketch” interface to accomplish these goals, which is still a viable option, but now we will look at taking another route to generate geometry in SimLab. We can directly create and customize basic shapes in the “Geometry” interface, such as the Cylinder tool shown in Figure 13. We can define its origin (or its starting position), its length, and its radius.
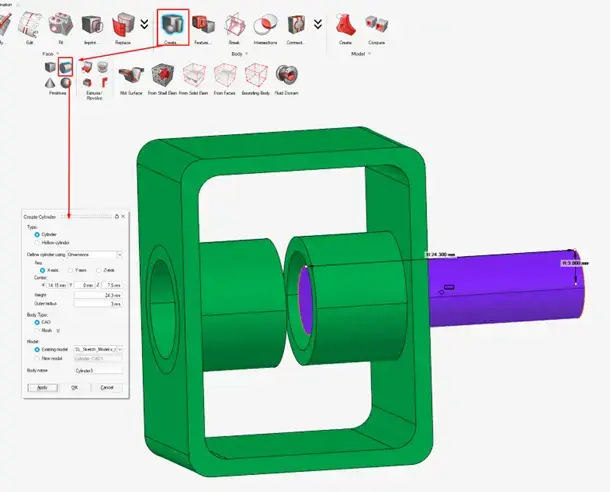 Fig 13. Using 3D CAD tools to add cylinder.
We will use this tool again to generate another small cylinder, and then we will use the Boolean combination once more to complete the arm of the actuator. The model thus far can be seen in Figure 14 below.
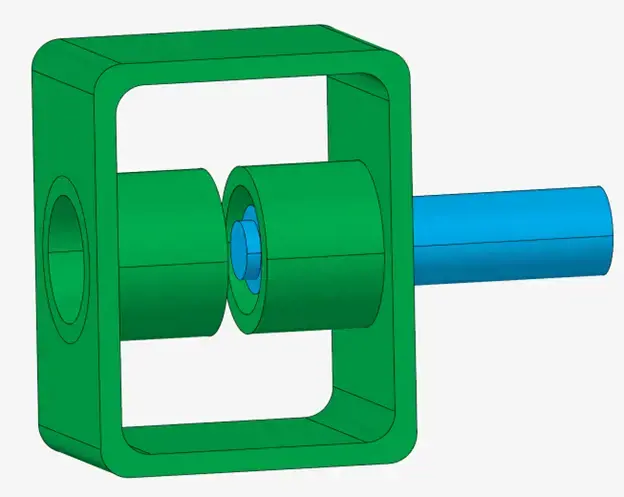
Fig 14. Completion of actuator arm within the support.
Finally, we will use a specialized version of the cylinder geometry tool to create the coil of the linear actuator: the hollow cylinder. This functions very similarly to the regular cylinder, but we can define the inner and outer radii. Again, we could have taken the “Sketch” interface approach, but multiple options are available within the software.
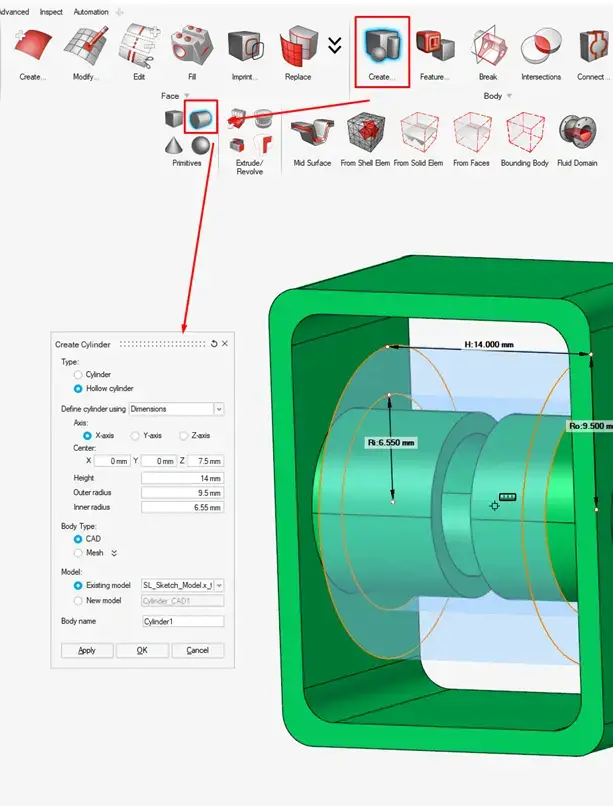
Fig 15. Addition of actuator coil via hollow cylinder CAD tool.
Now we have fully designed and customized the geometry for our linear actuator! We can see the final product in Figure 16 below. The color and name of each region can be specified so that the user can quickly and easily identify each individual component of the model.
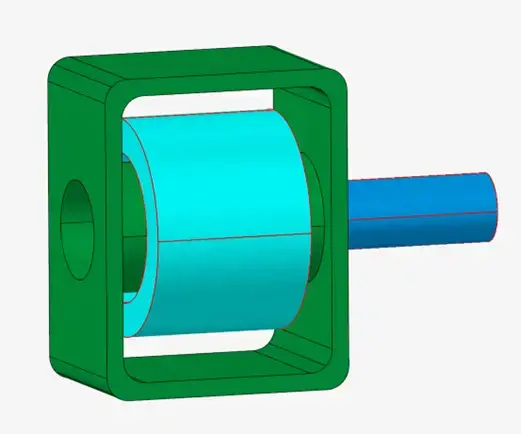
Fig 16. Complete geometry of linear actuator.
This has been a relatively simple example of geometry creation for electrical applications, and it only just begins to show what is possible in this software. As mentioned earlier, all of this is also available in Altair Flux, but this software offers a different GUI, toolset, and approach to solving this problem, meaning engineers have the choice of how they want to tackle their tasks. We are ready to move forward with the electrical simulation and analysis of our model in Altair SimLab, so be sure to follow up on the next blog to see that portion of the process! As always, please be sure to subscribe to our YouTube Channel for video guides, walkthroughs, and examples, and check out some of our other blogs to learn more about what is possible within the Altair suite of engineering software.
