Creating a Graphical User Interface (GUI) in Altair Compose
Altair Compose is made for doing math calculations, manipulating, and visualizing data, programming, and debugging scripts. See how to modify the GUI.
Creating a Graphical User Interface (GUI) in Altair Compose
It is common for engineers to find themselves solving unique problems that require individual solutions on a case-by-case basis, which can often make it challenging for us to find the right tool for the job. I know I often struggle with locating a prebuilt remedy, and when I do manage to track one down, it almost never fits exactly what I am trying to accomplish, or it is too broad of a tool that I do not need for a smaller task. Or maybe sometimes, the tool simply does not look like I want it to (I am a stickler for a good GUI after all).
That is why I, and many of my colleagues, so frequently end up writing our own script to complete the task at hand. This, however, can lead to its own set of problems: it can be difficult to use for a new instance of the same problem that started it all, or it can be borderline impossible for another engineer to decipher what your program is even trying to do, especially if you are anything like me, and often leave unnecessary chunks of code in place “just in case you need it later.” Or maybe you want to develop a tool that anyone on your team can use, even if they have no experience in engineering or related tools. That is where the power of Altair Compose and its built in GUI designer come in to save the day.
For the sake of this example, we’ll assume the desired task of this program is simple 3x3 matrix multiplication (this is almost trivial for many engineers, but the GUI is of interest here). Altair Compose has built-in feature that allows users to design a GUI, depicted in Figure 1, to run and control the code behind the scenes.

Once you have opened the UI designer tool, you are greeted with a relatively simple display that gives you everything you need to make it possible for anyone to run your code. Using basic drag-and-drop, on what will ultimately be the dialogue box that opens when your code is run, you can add elements such as text boxes, tables, buttons, and user inputs, among several other options. Figure 2 demonstrates a straightforward UI setup with several of the basic features included, which will allow any user to define two 3x3 matrices for multiplication or to use default values, which can be manually set by whoever designs the GUI.
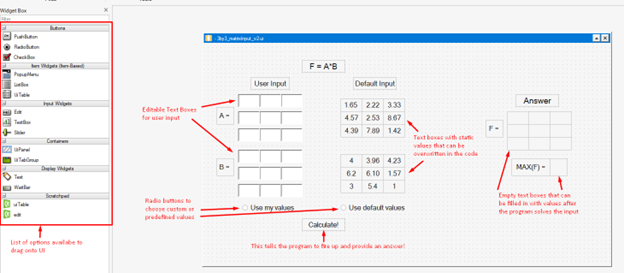
Figure 2. Design tool for GUI
The only real “heavy lifting” in this process is to write functions connected to certain buttons or boxes that tell the program what to do with user input and where to put final results. Lucky for us, Altair Compose provides two files when you save this project: a .ui file (for the user interface) and an .oml file (which houses the automatically generated code for the ui). From here, I am able to modify the content of the .oml file to properly handle all the information necessary. Unless you need to make very minor changes, such as choosing a very specific color for the text or moving a text box over by a few pixels, you can, for the most part, skip right past the code that defines these elements, seen in Figure 3.

Like I just mentioned, the last part is where the designing engineer actually supplies his or her expertise. Again, for this specific example, it is nothing extraordinary, but we still have to save these user inputs as variables in the code, check which radio button has been selected, and perform the calculations. A small portion of this process is shown in Figure 4, where I check if the “Use my values” or “Use default values” radio button has been selected, save the user inputs if it is the former or define the default numbers for the latter, and, finally, perform the matrix multiplication.
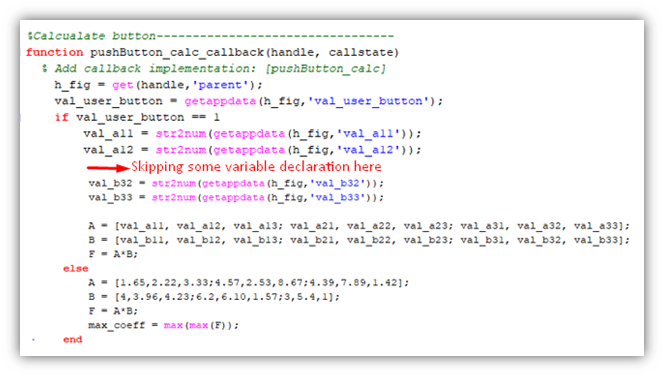
Figure 4. Function to calculate results
Similarly, we need to store the individual numbers from each matrix position so we can tell the script which specific text box in which to place them in the outputs portion of the GUI. This last part is perhaps the most tedious, mainly due to the fact that the answer is a 3x3 matrix, requiring a function for each entry so we can properly display them; however, since we are basically doing the same thing nine times in a row, this is one of those rare times copying and pasting code is relatively safe. Figures 5a and 5b shows one such example for one cell in the output matrix.
 Figure 5a. Storing the information for the output text box
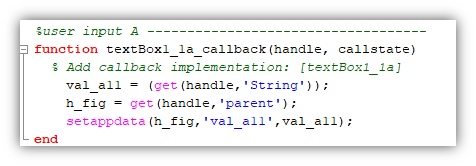 Figure 5b. Callback function to update the output text box
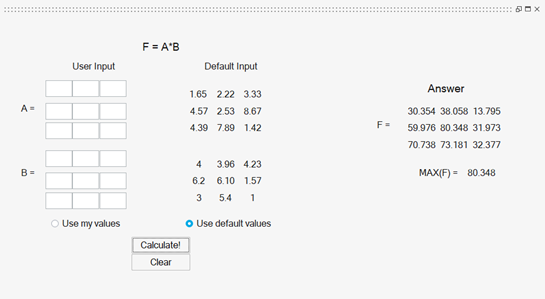
Figure 6a. Results after selecting default values and pushing “Calculate!”
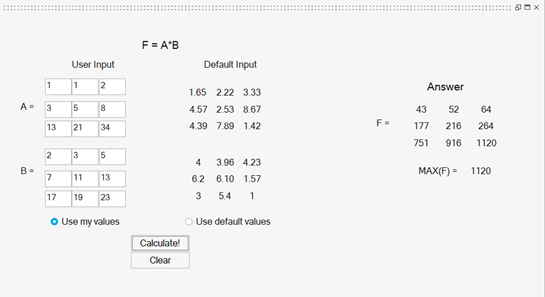
This GUI is not limited to simple calculations, so see how far you can take it! Feel free to reach out to TrueInsight with any questions or feedback, and make sure to use Altair Compose to its fullest extent!
